Setup ChatBizz Guide
Discover the power of our advanced chatbot, seamlessly blending the robust capabilities of React and Python to deliver a cutting-edge user experience. Whether you're a business owner looking to enhance customer interactions or a developer eager to explore the potential of AI-driven conversations, our chatbot has you covered.
Please follow the below steps to setup this project.
React Js Setup
- Install Node.js and npm:
Ensure you have Node.js and npm (Node Package Manager) installed on your machine. You can download and install them from the official website: Node.js Make sure you are using Node version >= 18.*.
- Git
Make sure to have Git installed globally & running on your computer. If you already have installed git on your computer, you can skip this step.
Please run the below commands from the Frontend folder.
| Command | Description |
|---|---|
| npm install | To install all the required dependencies in the 'node_modules' folder, simply run
'npm install' without any arguments. This command will resolve the necessary
dependencies listed in the 'package.json' file.If you encounter any errors during the
installation, please ensure that your Node.js version matches the one specified above.
Alternatively, you can try using 'npm install --force' to forcefully install the
dependencies.
|
| env | Duplicate the .env.example file and rename it to .env.Open the
.env file in
a text editor of your choice. Look for a placeholder related to the backend URL, often represented
as REACT_APP_API_URL or something similar in React projects. Replace the placeholder
with the actual
URL of your backend server.Save the changes to the .env file.
|
| npm start |
Runs the project locally, starts the development server and watches for any changes in your code,
including your HTML, Javascript, sass, etc. The development server is accessible at
http://localhost:3000/
|
| npm run build | Generates a /build directory with all the production files. |
- React Code Setup
Python Setup
- Python
Make sure to have Python3 installed & running on your computer. If you already have installed Python on your computer, you can start from below step. We suggest you to use Python(3.10.8).
- Git
Make sure to have Git installed globally & running on your computer. If you already have installed git on your computer, you can skip this step.
Please run the below commands from the Backend folder.
- Create virtual environment
- python3 -m venv venv
- Activate environment
- source venv/bin/activate
- pip install -r requirements.txt
- Database migration (_this project currently uses postgresql to manage the database)
- alembic upgrade head
- Start server
- python main.py
- Currently, there are two methods for assigning admin roles to a user within the system:
- Manual Database Update:
- Run below query in your database for create a admin & project.
- If you run this query in your database then your Login Credential will be :-
- Email:-
admin@chatbizz.com - Password:-
12345678 - User Profile Update API:
- Alternatively, an admin role can be conferred upon a user through the utilization of the User Profile Update API. This API allows for the modification of user profile details, including the user's role. It is noteworthy that any regular user possessing direct access to the API has the capability to independently update their own role. It is essential to emphasize that standard users do not have the capacity to modify their role through the frontend user interface; rather, this action must be performed through the designated API.
- Python Code Setup
| Query |
|---|
|
INSERT INTO users (id, name, email, weaviate_user, hashed_password, role, session_id)
VALUES ('fc1cc7ef-3845-48d6-8ff1-1f2f1ba0d56a', 'admin', 'admin@chatbizz.com', 'finish', '$2b$12$aHmAnHwug/3AKdQwBT6I1e.BfgTY35bCSab0hHA7as9eEpYbUZ6Yq', 'admin', '0cf4a79d-6afc-4ba0-a1d9-cda18f013ab4'); |
| INSERT INTO projects (id, user_id, company_name, description, api_key, project_moto, welcome_title, background_image, is_published, is_api_enabled, bot_name, answer_limit, base_color, text_color, bot_image, agent_name, agent_logo, is_deleted, created_at, updated_at) VALUES ('a17b2537-16b0-429e-b370-73c7b1e573ef', 'fc1cc7ef-3845-48d6-8ff1-1f2f1ba0d56a', 'chatbizz', 'Hello How Are you', '5fd6b1e95e09b98961f488983a4a50cf', 'chatbizz', NULL, 'https://ik.imagekit.io/aifactory/a17b2537-16b0-429e-b370-73c7b1e573ef_background_image', true, false, 'YAHOO', 10, '#ff3838', 'black', 'https://ik.imagekit.io/aifactory/a17b2537-16b0-429e-b370-73c7b1e573ef_bot_image', NULL, 'https://ik.imagekit.io/aifactory/a17b2537-16b0-429e-b370-73c7b1e573ef_agent_logo_f13tn1u9v', false, '2023-12-21 10:49:48.665', '2024-03-11 16:50:06.373'); |
Embedding Chatbot on Your Website
- Step 1: Access Your Chatbot from Account
Log in to your Chatbot account and navigate to the integration section to obtain the embedding script.
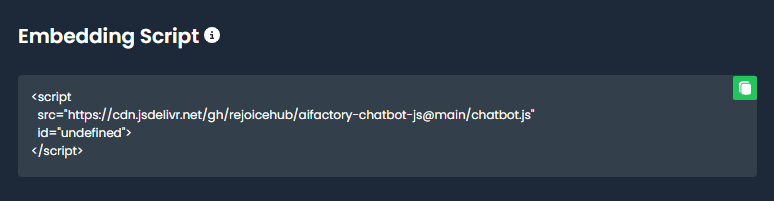
- Step 2: Copy the Embedding Script
Copy the provided embedding script. It should look similar to the following:
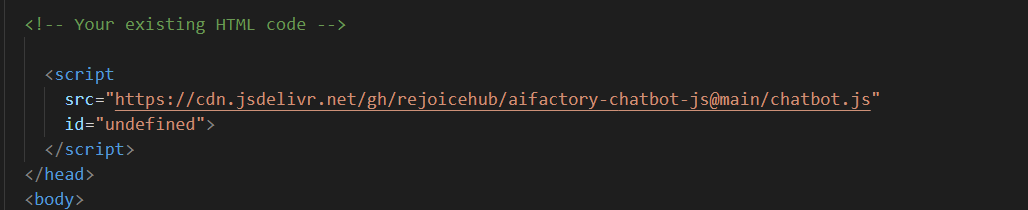
- Step 3: Open Your Website's HTML File
Open the HTML file of the webpage where you want to integrate Chatbot
- Step 4: Paste the Script Code
Paste the previously copied script code just before the closing body tag in your HTML file.
It's usually located near the end of the HTML file.
- Step 5: Save and Publish
Save the changes to your HTML file and upload it to your web server. If your website is hosted on a platform like WordPress, Wix, or any other CMS, find the appropriate section to add custom scripts and paste the embedding script there.
- Step 6: Verify Integration
Visit your website and verify that Chatbot is now accessible. You should see the chatbot widget or interface, depending on your customization.
Understanding of Chatbizz
- 1. Stats Section:
Upon logging into Chatbizz, Chatbot owners are greeted with a comprehensive Stats screen that provides a detailed overview of their Chatbot's performance.
- Estimate Characters Replied:
-
Keep track of the characters replied by your chatbot, providing insights into the depth and extent of user interactions.
- Number of Sessions:
-
Monitor the number of sessions, reflecting the level of engagement your chatbot has with users over time.
- Total Messages Served:
-
Get a count of all the messages sent to users, gauging the overall activity and efficiency of your chatbot.
Additionally, graphical representations of sessions and messages are available, offering a visual understanding of trends within custom time frames.
- 2. Chat History Section:
-
Explore the Chat History section to review and analyze past conversations, gaining valuable insights into user interactions and improving the chatbot's effectiveness.
- 3. Knowledge Source Section:
-
Set up a knowledge-based chatbot effortlessly! Utilize various knowledge sources such as PDFs, text files, simple text, or doc files. Enable your chatbot to provide informative and FAQ-style responses, enhancing the user experience.
- 4. Chatbot Settings Section:
-
Customize your chatbot's identity and behavior to suit your needs. Choose between an "Individual" or "Company" chatbot and define details such as Bot Name, Tagline/Custom Label, Bot Text Color, Bot Color, Welcome Message, Chatbot Icon, and Background Image.
- Behaviour Settings:
-
Configure your chatbot's behavior, choosing between a "General Chat" for casual conversations and a "Knowledge Chat" for information-focused interactions.
- 5. Embedding Script:
-
Easily integrate your chatbot into your website using the provided embedding script. Enhance user engagement by making your chatbot accessible directly on your website.